How hard is it to create a website?
Well, these days, it’s not hard at all; it has actually become very, very easy. If you are wondering about this question, I can assure you that it is much easier than you probably imagine.
In fact, if you can read this, and use a mouse and keyboard, I guarantee that YOU can create a website too.
In this article I will show you how to create a website from scratch. And to show you just how ridiculously easy it is, I’ll give YOU the chance to do it yourself.
- Website Technology Has Come a Long Way
- Can You Really Create a Website So Quickly?
- WordPress
- Go Here
- Why Did I Choose Siterubix?
- Let's get started
- Create Your Website
- Your New Website is Born
- The Website Dashboard
- Let's Create Some Content
- Create a New Post
- Add Content to Your New Post
- The Block Options Toolbar and Panel
- Saving and Publishing Posts
- What is the Difference Between a Post and a Page?
- What are WordPress Themes?
- Turbocharge Your WordPress Website with Plugins
- Next Steps from Here
- Conclusion
Disclosure: Some posts on this website may contain affiliate links. If you follow a link and make a purchase or sign-up for a service, we may earn a small commission at no extra cost to you. Thanks for your support.
Website Technology Has Come a Long Way
There was a time when you had to be a computer wizard just to get the most basic website up and running. Thankfully, those days have long since passed, and website-building technology has come a long way since then.
Nowadays it is possible to whip up a professionally-designed website in less than a minute. You can then easily configure this website to handle almost any application imaginable.
Modern website-creation tools allow you to focus on producing website content and do not burden you with all the technical distractions that came with old-school websites.
Can You Really Create a Website So Quickly?
What exactly will you get for your new made-in-a-minute website?
You will have a working website that is immediately accessible on the internet. If you enter the site’s address into your browser it will load in your browser’s window right away.
Your site will have a default layout, a rudimentary navigation menu and 1 or 2 pages containing filler content. It will be very basic, but it will be a fully-functioning website.
From here, you can change the default elements to better suit your liking. You can add images to brighten your pages up. Or you can just begin adding your own content.
All of these operations are no more difficult to perform than the creation of the website itself, as you will soon see.
WordPress
In this article, I will show you how to use WordPress to create a website.
WordPress is the software magic that makes it possible for ordinary people like you and me to create amazing websites. And it lets you do it without getting your hands dirty with programming or other technical stuff.
WordPress is a Content Management System (CMS). That’s just a fancy name for something that makes it easy to build and manage a website, and its content.
WordPress is not the only CMS available, but it is by far the most popular, and certainly one of the easiest to use. Almost half of all the world’s websites run on WordPress, including this one.
That’s important when you look for somewhere to host your website. You will not have any difficulty finding WordPress hosting. Practically all website hosting companies offer WordPress hosting.
WordPress is free software. You can download it from wordpress.org and install it on your own server if you want to. But why bother when commercial WordPress hosting is so cheap and offers many advantages over self-managed hosting?
For our purposes, I will even show you how to start your own website for free. You will acquire a valuable new skill and will not even pay a penny for it.
Go Here
To show you how you can easily create a website, we will use a hosting platform called Siterubix.
Siterubix is owned and managed by Wealthy Affiliate. This company offers an excellent affiliate marketing platform which includes training, website hosting and several useful tools for affiliate marketers. You do not need to sign up for any of Wealthy Affiliate’s products to use the free website though.
I have been a paying member of Wealthy Affiliate since 2018. It is where I received my affiliate training and where I still host most of my own websites, including goodmisery.com, the site that you are reading this on right now.
If you want, you can read about affiliate marketing in my article “What is Affiliate Marketing and Does it Work?“. You can also learn more about Wealthy Affiliate in my, hopefully not too biased, Wealthy Affiliate review.
Why Did I Choose Siterubix?
- Since I already have access to the platform, it made it very easy for me to grab the visual material that I needed for this article.
- You get a completely free website which you can use to try out what I will be showing you. It’s not necessary to have access to a WordPress dashboard in order to follow this article. But it is very reassuring when you accomplish something yourself, and can also validate what you have learned.
- You can use this website for anything else that you want. It will be yours forever and to do with as you please. There is no obligation but, since it is free, you will have limited access to some features.
- Unlike some other free websites, there is no forced advertising or company branding on Siterubix websites.
- You get a free bonus – access to the first 10 lessons of each of 2 invaluable training courses. The training is mainly for affiliate marketing and you can ignore it if you have no interest in this. But some lessons cover aspects of website creation that you might find useful.
- You get limited access to a keyword research tool. Depending on what your intentions behind creating a website are, it could be very useful to understand its purpose and use.
- For 7 days, you also get real-time 24/7 help and support in Live Chat, in case you have any questions.
Let’s get started
To follow along with this tutorial, head on over to Wealthy Affiliate and create a free Starter account. This will give you access to your free website.
There is nothing to worry about by signing up. You will not be under any obligation and you won’t be charged for anything. You will also not be asked to provide any credit card information.
Once you log into Wealthy Affiliate, click on one of the “Start Training” or “Get Started in The Training” links on the welcome page.
You should see something similar to the following image.
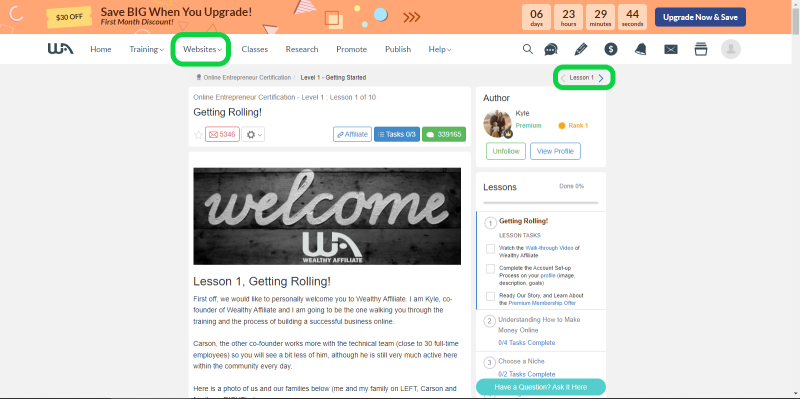
If you want to see Wealthy Affiliate’s own training on how to create a website, navigate to lesson 4 of the training called “Building your OWN Niche Website“. You can do this by clicking on the right-arrow next to the lesson number.
Including the time it will take you to watch the video, it should take you around 30 minutes to complete.
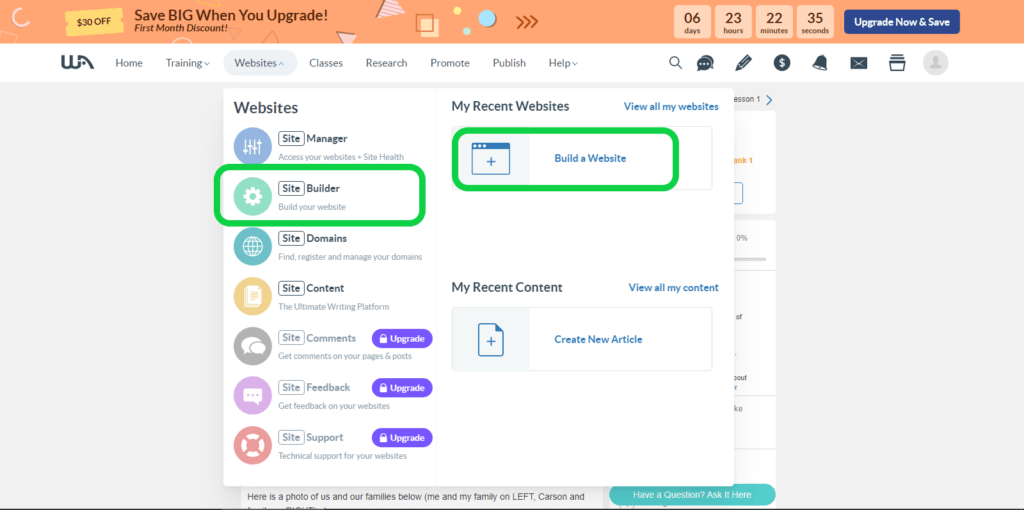
However, I recommend that you get back to that later and instead follow this much quicker route. Click on the Websites menu and you should soon see the Websites screen, which should look something like this image.
Create Your Website
The next step is to click on Site Builder. When that screen appears click on Free Domain.
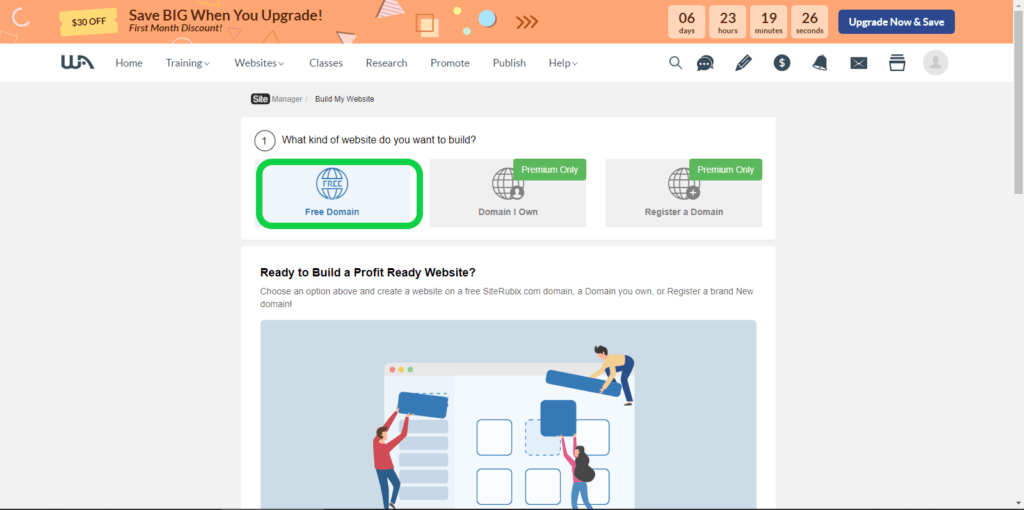
Next, choose a domain name.
What Is a Domain?
If you don’t know what a domain is, think of it as a website’s address on the internet. Your domain is how people will find their way to your website.
Google.com is the domain for Google’s search engine, and goodmisery.com is the domain for this website.
Domain names are usually paid-for. A free website like yours will therefore exist as a sub-domain of a domain that belongs to someone else. In this case, that domain will be siterubix.com.
If you want to call your website mysite, then your domain name will be mysite.siterubix.com and not mysite.com as you would expect. The mysite prefix is the thing that distinguishes your website from any other sub-domains that might exist on siterubix.com.
If you have a specific idea about what you intend to use your website for, enter an appropriate name in the name field now. If this is just a learning exercise then use any name that you want.
Your name must not contain spaces. Although it is allowed, ideally your name should not use dashes or other punctuation either.
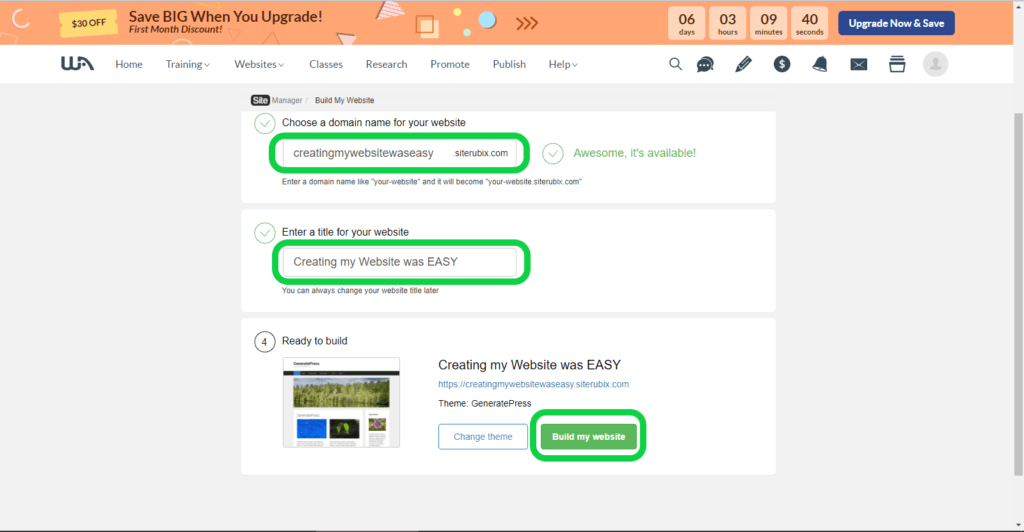
Notice that the name is being verified as you type it in. If it already exists, you must use a different name. If it is unique, it will be accepted and you can move onto the next step.
Enter a name for your website. This is usually the same as, or similar to, the first part of your domain name, and may contain spaces.
Build Your Website
At this point your site is ready to be built.
If you want to, you can click the “Change theme” button and browse some of the the themes available to Premium members. As a Starter member though, you have only 1 theme to choose from, called GeneratePress.
I will discuss themes a little later on in this article. For now, just click on the “Build my website” button.
After a few seconds your website will be ready and you should see something like this.
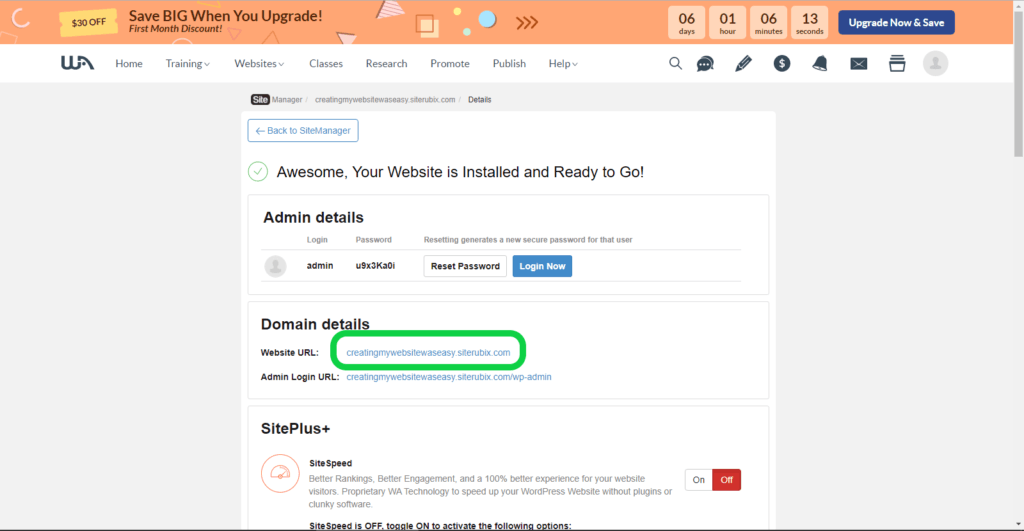
Test that the website exists and works by clicking on the website’s URL under “Domain Details“
Your New Website is Born
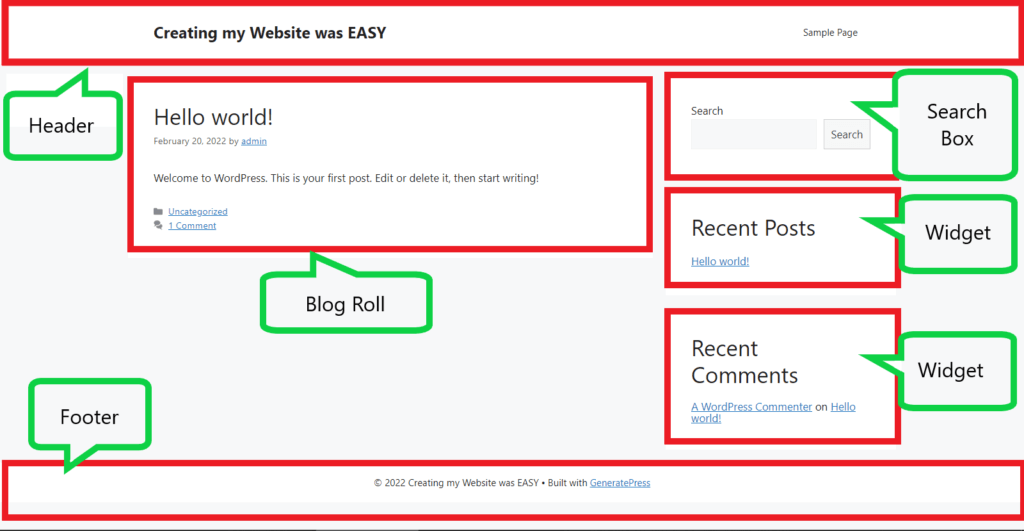
Your new website should look something like the image below (without the highlighted red and green boxes and text balloons).
Honestly now, how simple was that? If it had not been necessary for you to follow my instructions, wouldn’t you say that it would have easily taken you less than 1 minute to do this? Of course you would.
So, the first thing that you probably noticed is that your new website looks nothing like the thumbnail preview image that you saw earlier.
The reason for that is that the preview website contained images and your site does not, but that is easy to remedy. The structure and layout of your website should look similar to the preview though.
Explore Your New WordPress Website
Before we go on, have a look at your website again. Play around with it. Try out the search bar. Click on some of the links. Use the menu (it contains a single item called “Sample Page”).
You should see that it is more than just a single page on the Internet. There is already quite a lot of functionality built-in. Let me point out a few of the different elements for you.
The Elements of a WordPress Website
- At the top of the screen there is a header containing your site’s name and a menu on the right. A website’s header is usually static and remains visible as users move from one area of a website to another.
- Directly below this is a blog ‘roll’ containing 1 post entitled “Hello World”. A blog roll displays a site’s posts in sequence. When you add a new post, it will appear in the top position and all older posts will move down below it.
- Click on the “Uncategorized” link and your website will display all the posts categorized as “Uncategorized”. Categories are definable and you can add new categories or delete existing ones.
- Click on the “1 Comment” link and you will see comments posted by your users, along with options to manage them.
- On the right is an invisible column called a sidebar.
- The first item in the sidebar is a search box. Visitors can use it to search your website for content that they are looking for.
- Below this is a Recent Posts widget which displays linked titles of your last few posts.
- Below that is another widget. This one displays links to the last few comments left by users on ANY post on your site. Again, follow the link to see the comment.
- At the bottom of the page is a footer. Right now, it only contains a copyright notice, but you can configure it to also accommodate other widgets, links and menus.
You can customize, move around or delete all of these elements, or you can add other elements that are not immediately visible here.
The Website Dashboard
When you created your website and you clicked your new website’s URL to take you there, your website should have opened in a new browser tab or window. You should now go back to that previous tab or window, which looked like this.
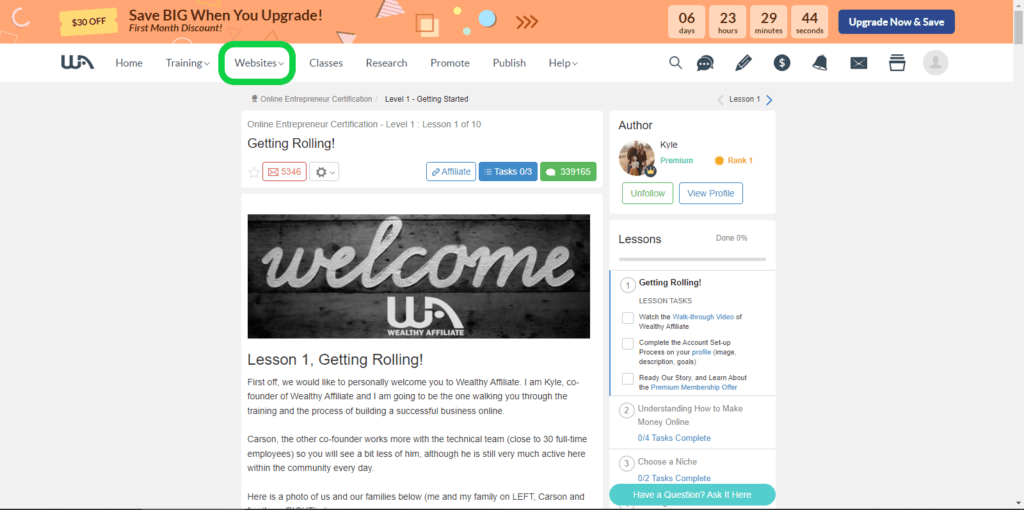
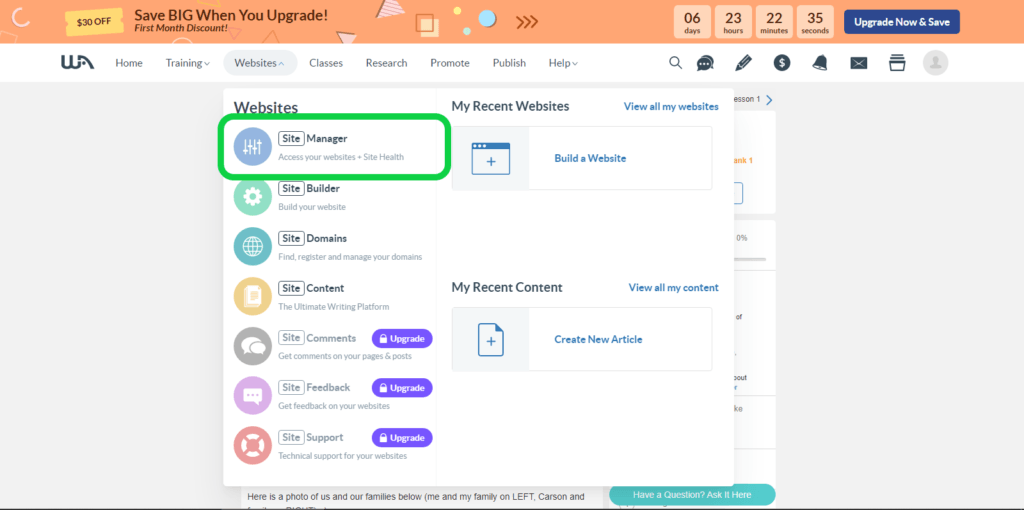
Once you are there, click on the Websites menu. After the Websites page has loaded click on Site Manager.
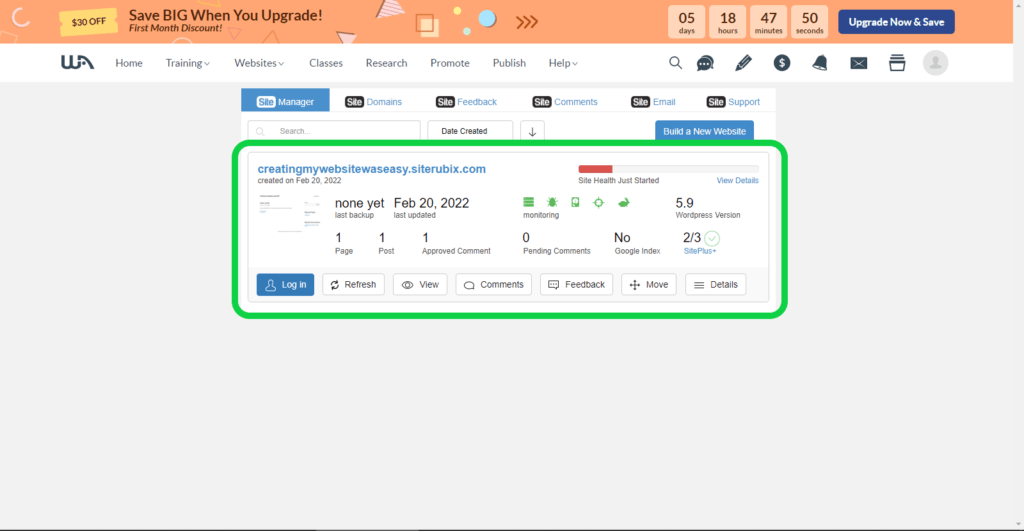
You should now see a rectangular dashboard panel which summarizes a few things related to your new site. If you ever build more websites on the Siterubix platform, you will see one dashboard like this for each website that you create.
I should mention that these website management screens and dashboards are unique to Wealthy Affiliate and Siterubix. If you choose to host a website anywhere else, you will find different website management arrangements and layouts, and it is likely that the instructions on this page will not work.
Let’s Create Some Content
I have shown you how easy it is to create a new WordPress website. Now let me show you how you can easily add your own content to it.
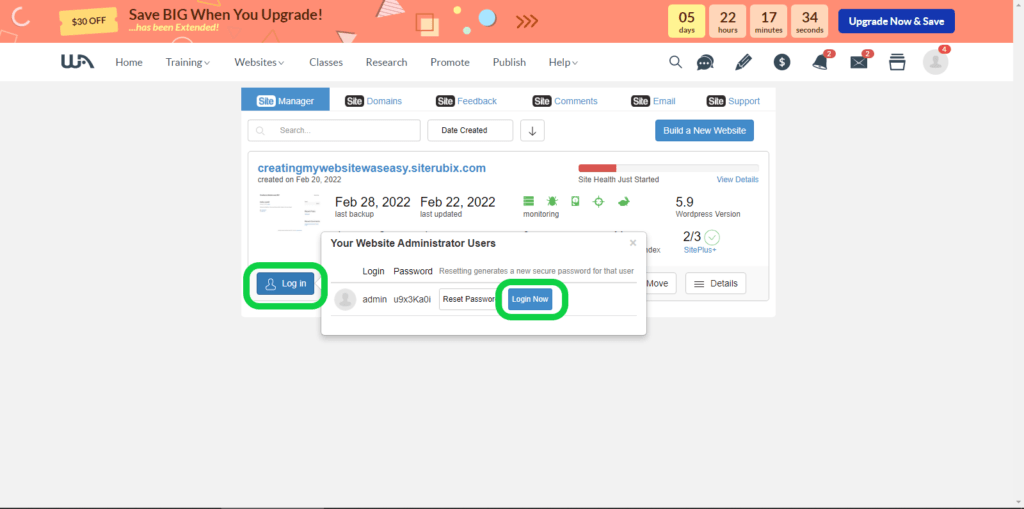
Click the Log in button on your site’s dashboard. A dialog box should pop up that indicates the username (admin – that’s you) and password to log in to your site. For now, just click on the Login Now button.
This should log you into your WordPress dashboard, and you should see something similar to this image
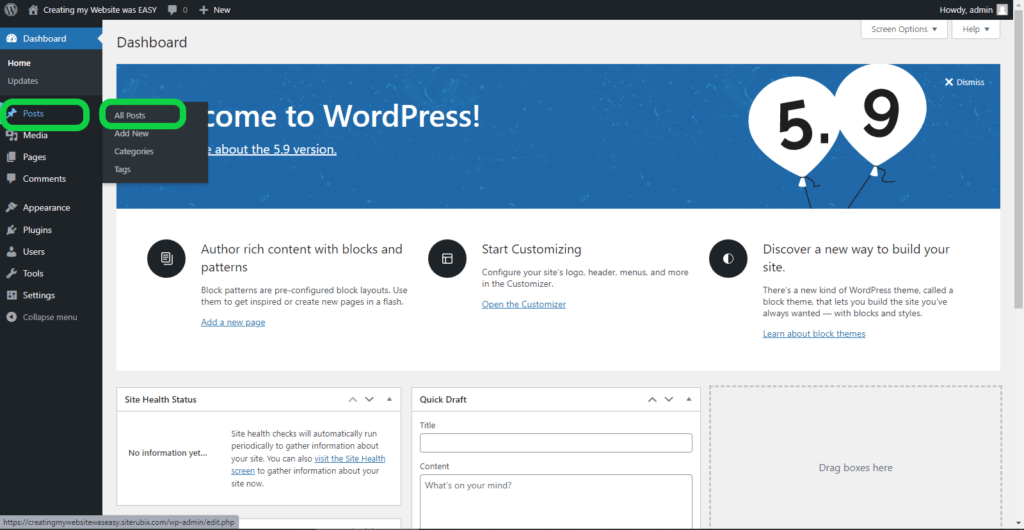
The stuff in the center of your screen may look different to this screenshot, but don’t worry about that. As long as you see something that resembles the dark gray column on the left of the image, you are fine.
Create a New Post
Now let us add another post to the Hello World example that already exists on your website.
Move your mouse over the Posts menu on the left. From the sub-menu that should appear select All Posts. If you are on mobile just tap on Posts and the other options should appear directly below.
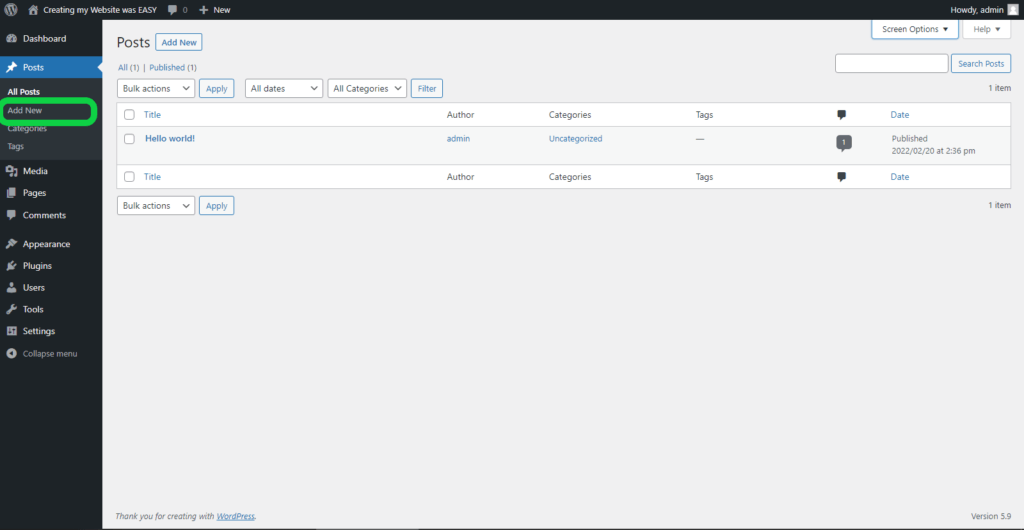
You should see a screen that lists every post that exists on your website. Right now, there should only be one titled “Hello world!”. In the Posts sub-menu on the left, click Add New and you should soon find yourself in the WordPress block editor, also known as Gutenberg.
Add Content to Your New Post
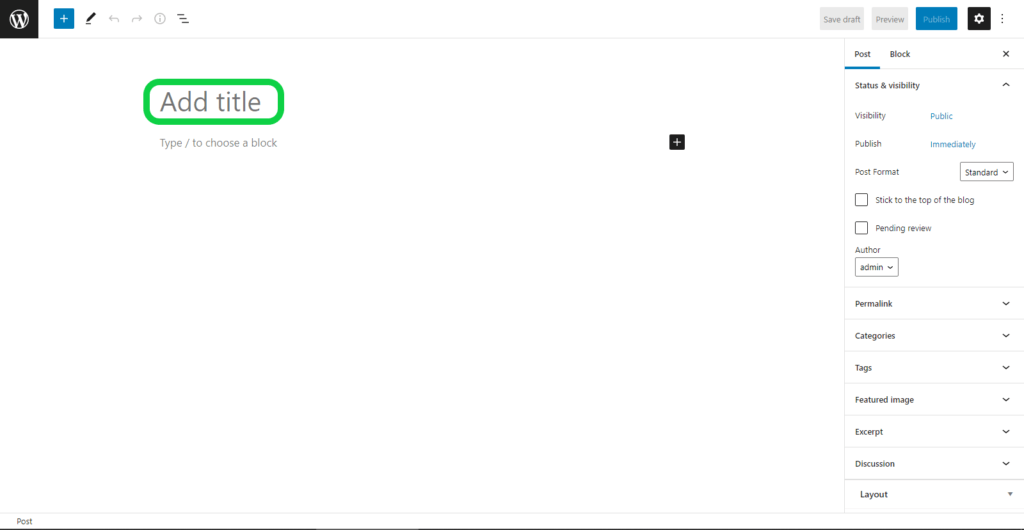
Notice the ghosted text Add Title near the top of your page? When you create a new post or page, WordPress automatically creates a Title Block for you. You cannot remove it, because every post should have a title.
You should see a blinking cursor in the block. If not, click on the Add Title text until you can see it. Now enter a title for your post. I will give my post the imaginative title of Post #2.
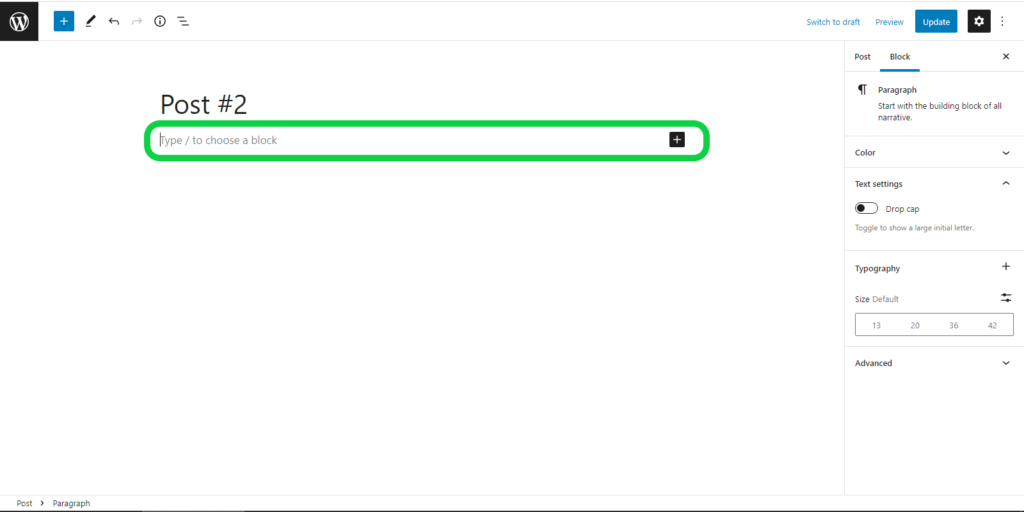
After you press Enter you should notice that your cursor is in a new block with the ghosted instruction to Type / to choose a block.
Do that and a drop-down menu will appear near the cursor with a selection of your most-used blocks. If you just begin typing text however, the block will default to the paragraph block type.
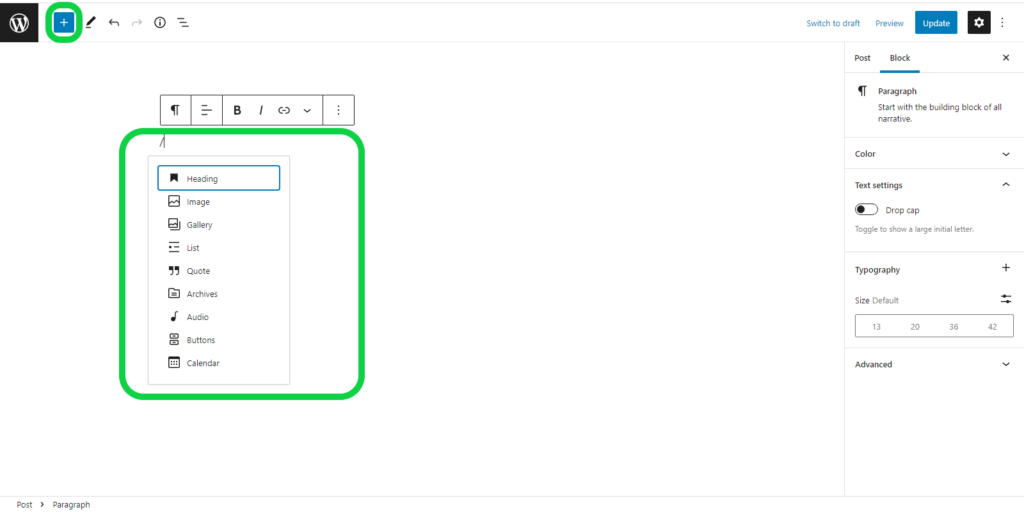
Press the / key and then select Heading. If, for some reason Heading does not appear, type the first few letters of the word until you see it. Alternatively, click the blue and white + icon near the top-left of your screen. This is the Block inserter button. Select Heading from the options listed there.
Now type the first heading for your post and press Enter. I chose WordPress is Wonderful.
The Block Options Toolbar and Panel
Click on the heading that you just created and you should see an options toolbar appear. If it does not appear in the position shown in the image below, then you should find it as a menu below the main icon bar at the top of your screen.
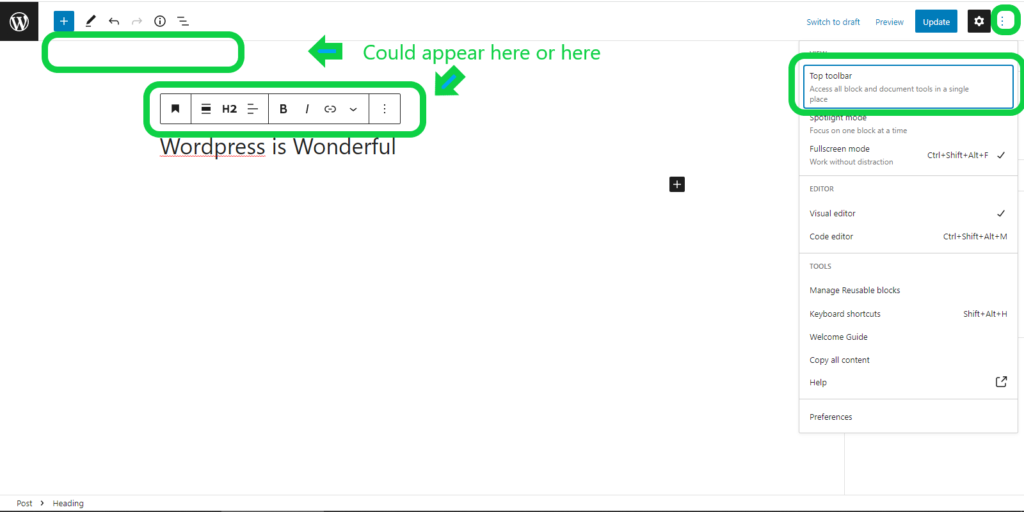
To switch between the two possible positions, click on the 3 vertical dots at the top-right of your screen then click on the Top Toolbar option.
Every Gutenberg block has its own options toolbar. Some, like the drag icon, perform the same function across all block types, while others control settings relevant to a specific block type only.
The first icon indicates the block type and lets you change the block to a different, but related, type.
The next icon lets you drag the block to any position in your document. Add another few paragraph or heading blocks to your post and try it out.
The up and down arrows next to the drag icon do the same thing, but move your block one block position at a time.
You can hover your mouse over any of these icons for a brief description of their function.
Some options, such as Link, require you to select some text first, before you apply the option.
Try These Simple Exercises
Change your heading to a paragraph. Notice how your text is retained, but is now formatted as a paragraph instead of a heading? For now, change this block back to a heading.
You should see further settings in the options panel on the right-hand side of the screen. If you don’t see this panel, make sure that the gear icon and Block tab are highlighted, and that the block you are working on is selected by clicking on it.
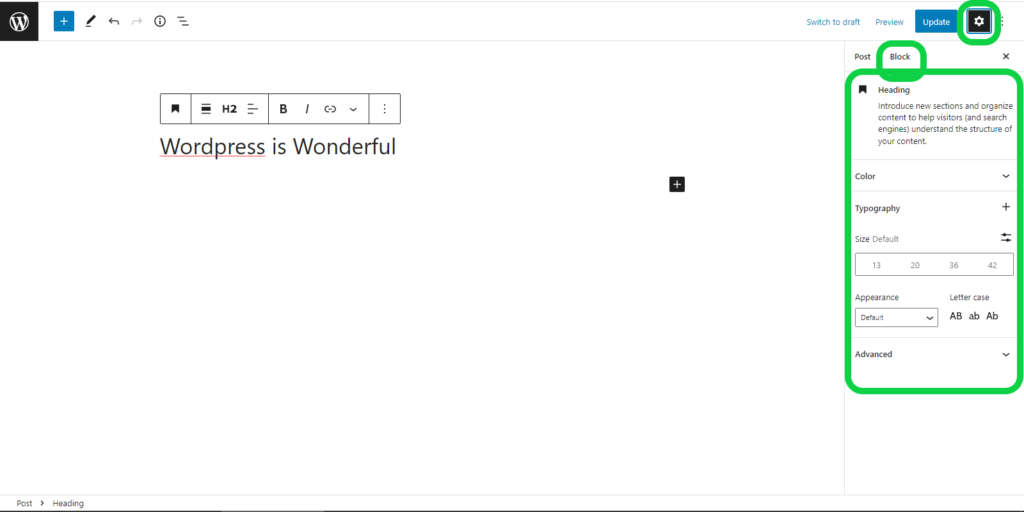
I encourage you to explore the various choices in the block options panel and the additional options on the right-panel to understand what they do.
Try to add different block types to your post and experiment with them and their options to see how you can use them. List, image and button blocks are good ones to start with.
Saving and Publishing Posts
As you create your content, you should use the Save draft option regularly to ensure that you do not lose any of your work. This will save your progress without making your unfinished content visible to your site’s visitors.
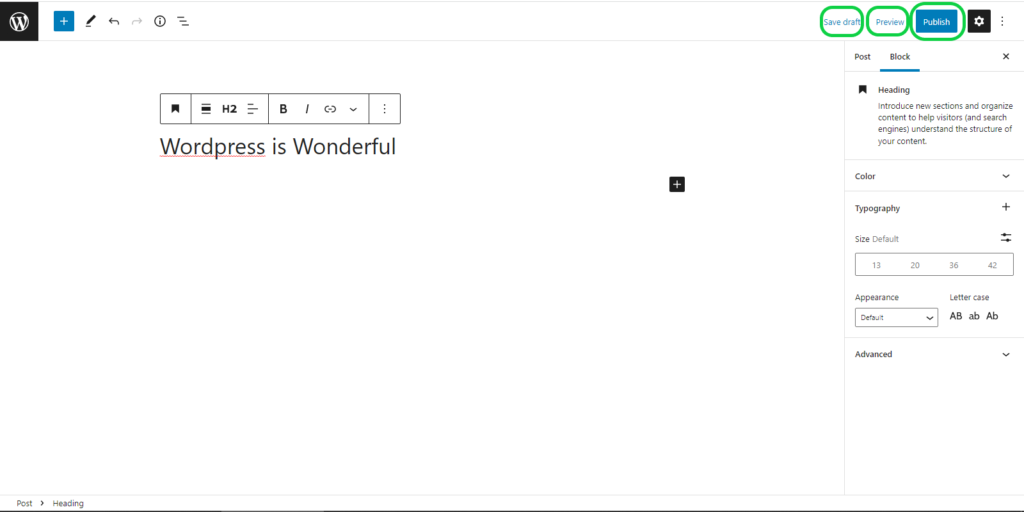
To see what your post will look like when it is published, click on the Preview button. Select from the list of device previews, then select Preview in new tab from the menu.
When you are satisfied that your content is ready to be seen by the world, click the Publish button. This will save your work and make it visible on your site. Because it is a post it should appear at the top of your blog roll. In the process, older posts are moved down.
You should now have enough information to produce simple but complete posts.
What is the Difference Between a Post and a Page?
Now that you know how to produce a WordPress post, you have probably started to wonder how it differs from a page.
There is really not much difference. Pages are usually ‘static’. They are generally used for About pages, Terms of Use, Policy documents and sometimes as the main page of a website. On the other hand, posts are intended for blogging content, and to be listed on a “roll’
Posts usually allow users to voice opinions or ask questions in the form of comments. Pages generally do not allow comments, although some themes deviate from this and do allow comments on pages.
Posts also allow the use of categories and tags, but pages do not.
You manage pages in WordPress in pretty much the same way that you manage posts. Pages have their own menu entry on the WordPress dashboard. It looks a lot like the Posts menu, but without the Categories and Tags menu selections.
What are WordPress Themes?
I have mentioned themes previously in this article. If you have not already guessed, themes are ready-made templates that you can use to create your website.
Themes are largely responsible for WordPress’ ease of use and popularity.
There are general-purpose themes, and themes that are more suited for specific website applications. For example, a blog has different layout requirements to a news website which, in turn, is very different to how an eCommerce website should look and work.
There are themes that cater for all of these applications, and more.
I know that if I have to choose and match colors, fonts and other design elements for my website, the end result is guaranteed to be an eyesore. It will probably not be too user-friendly either. If your design skills are as poor as mine are, you will know exactly what I am talking about.
At the beginning of this post I said that you could create a professionally-designed website. Well, WordPress themes are what make this possible.
They are created by professional designers who make the difficult design choices for you. They allow you to spend more of your time creating content instead of worrying about design decisions.
Themes are usually free, but many have additional features that you can unlock for a fee. Fortunately, most free themes are still perfectly usable. As a beginner, you probably do not need to upgrade to a paid version for features that the basic theme does not include.
GeneratePress is the only theme that you have access to as a Starter member but, if you were ever to upgrade to a Premium plan, you would be able to choose from a collection of over 9,000 free themes.
Turbocharge Your WordPress Website with Plugins
Plugins are another big reason for the widespread popularity of WordPress. Together with themes, they make WordPress extremely versatile, and able to adapt to almost any purpose
They let you add all kinds of features to WordPress. To give you some idea of the possibilities, here is a brief list of features that you can add to your website by using plugins:
- Easily create tables to present information in a structured manner.
- Optimize your site for search engine performance.
- Add additional block types to the Gutenberg block editor.
- Create forms to allow users to join mailing lists, subscribe to newsletters, or contact you.
- Add eCommerce features to turn your website into an online store.
- Add payment facilities for eCommerce
- Improve security
- User registration and management
- Spam protection
- Use Google maps on your website
- Language translation
- Product reviews and ratings
- Social media sharing
- Add geo features that respond according to the user’s location or region.
Most WordPress plugins are free, and some offer additional features that you can unlock for a fee. Just like themes, many plugins are quite usable in their free configurations, and upgrades should be unnecessary for most purposes.
Once again, as a Starter member, you only have access to 2 pre-installed plugins. Members who have upgraded to Premium have access to more than 50,000.
Next Steps from Here
The purpose of this article is to demonstrate just how simple it is to get a WordPress website up and running and to add basic content to it.
However, it was never meant to be a comprehensive WordPress tutorial, so I will not be going through every WordPress feature with you.
I hope that you were pleasantly surprised to discover the ease with which you can create a working website out of nothing. And I hope that I have given you sufficient confidence that will encourage you to explore WordPress further on your own.
It will cost you nothing to try.
I really recommend that you go through the free Wealthy Affiliate lessons that are available to you. They are very short and painless to work through.
They do focus on using a website to start an affiliate marketing business, but you will also learn some relevant things about websites and especially the important relationship that they have with search engines like Google.
And, if by chance, you are looking at ways to earn money online with a website, I absolutely recommend Wealthy Affiliate’s training and platform without a moment’s hesitation. I honestly believe that there is no better introduction to affiliate marketing than what Wealthy Affiliate offers.
In case you missed the links that I provided earlier, you can read more about affiliate marketing in What is Affiliate Marketing and Does it Work? and also see my Wealthy Affiliate Review.
Conclusion
I hope that I have opened your eyes to the possibilities that WordPress places at your fingertips.
If you have no interest in affiliate marketing at all, but would still like to explore WordPress beyond what you can learn on Weathy Affiliate and Siterubix’s free offerings, I recommend that you try Bluehost.
For a really low monthly fee you get WordPress hosting, your own domain free for the first year, unlimited access to WordPress themes and plugins and Bluehost’s customer support. Bluehost is one of the very best paid hosting platforms for small websites.
If you liked this article, or would like me to do more articles or tutorials on WordPress then please indicate this by leaving a comment below. If enough of you ask me for this I may be tempted to do it.
